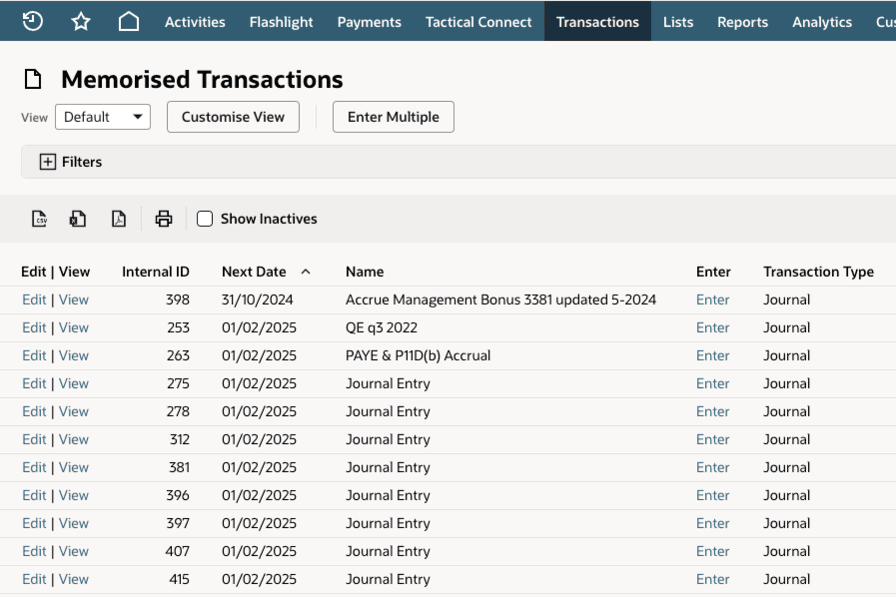
What is memorised transaction in NetSuite

Introduction
Whether you’re new to NetSuite or a seasoned user looking to make the most of its features, memorised transactions can save you time and reduce errors. But what exactly are they, and how do you use them? This guide explains it all.
What are memorised transactions in NetSuite?
A memorised transaction in NetSuite is essentially a time-saving feature that allows you to automate repeated financial entries. For transactions that occur at regular intervals, like monthly rent payments, subscription billing, or recurring journal entries, you can "memorise" the transaction to have it automatically created in the system as needed.
Key benefits of memorised transactions
- Saves time – Rather than manually entering the same transaction every month (or week), it’s done for you automatically
- Ensures consistency – Because the transaction is based on a saved template, you’re less likely to make errors typically caused by manual entry
- Improves efficiency – Automated transactions free up your time, allowing you to focus on higher-value tasks rather than repetitive financial data entry
Now that we know their importance, let's move on to creating one in NetSuite.
How to create memorised transactions in NetSuite
Creating memorised transactions is straightforward. Here’s a simple, step-by-step guide to help you get started.
Step 1: Create the base transaction
Start by creating the transaction you’d like to automate. This could be an invoice, vendor bill, journal entry, sales order, or any supported transaction type.
- Navigate to the appropriate transaction type page. For example, if it’s a bill, go to Transactions > Payables > Enter Bills
- Fill in all the required details. Be accurate with fields such as amounts, dates, and accounts to ensure consistency in future entries
Step 2: Memorise the transaction
Once the transaction is set up, you can memorise it.
- Click the Memorise button (which may be within the Actions menu) at the top or bottom of the transaction page
- If you're unable to see this button, check whether the feature is enabled in your settings. You may need the assistance of your system administrator
- Assign a name to the memorised transaction for easy identification later
Step 3: Set the schedule
A window will appear allowing you to define the schedule for the memorised transaction.
- Action - Set the dropdown based on your requirements:
- Template Only - To create a memorised transaction template that will not create any actual memorised transactions
- Reminder - To be reminded when the memorised transaction is due to be created so you can edit and check it prior to its creation
- Automatic - To create the transaction automatically based on the criteria you enter in the subsequent steps
- Next date – Set the date for the next occurrence. The system will replicate the transaction on this date and based on the frequency selected
- Repeat Every - Enter the number of times within the selected time period a transaction should be created
- Time Period – Choose how often the transaction should recur, such as daily, weekly, monthly, or annually
- Number Remaining – If the transaction only needs to run for a limited time, specify an end date or the number of occurrences (check the Indefinite checkbox if you would like it to repeat forever)
Step 4: Save the memorised transaction
Once you've configured the schedule, click Save. Your transaction will now be memorised and will generate on the system automatically based on the settings you've defined
Example walkthrough – recurring vendor bill
Imagine you have a monthly rent bill of £2,000 to the same supplier. Here’s how this would work in NetSuite.
- Go to the Enter Bills page and input the supplier name, amount, and other details
- Click Memorise once the transaction is complete
- Set the transaction Name as "Monthly Rent"
- Define the Time Period as Month and choose the next occurrence date (e.g., the 1st of next month)
- Save the schedule and confirm the transaction is set up in your Memorised Transaction List
NetSuite will now automatically create this bill at the start of each month, saving you from manually re-entering it
Tips for effectively using memorised transactions
- Review scheduled transactions regularly – Although automated, it’s essential to periodically review memorised transactions in case the details (e.g. amounts or terms) change over time
- Organise your memorised transaction list – Use clear and descriptive names so you can quickly identify recurring transactions
- Leverage reports – Utilise NetSuite reports to track all memorised transactions and ensure they’re functioning as intended
- Combine with approvals – Ensure memorised transactions go through appropriate approval workflows to maximise control and minimise errors
How memorised transactions streamline financial processes
Memorised transactions can be a game changer for businesses with repetitive financial tasks. By automating these entries, you reduce the risk of human error, save significant time, and improve your accounting team's workload management. The setup process might take a few minutes, but the time you save in the long run makes it well worth the effort
Start exploring memorised transactions in NetSuite today and experience how automation can bring more order and efficiency to your financial processes. Remember, every minute saved on manual tasks is a minute you can invest in growing your business.
